PR-Agent
Overview
CodiumAI GPT-4 powered PR-Agent is an open-source tool to help efficiently review and handle pull requests.
When added to a repository PR-Agent will automatically analyze submitted Pull Request.
Try it in a public repository
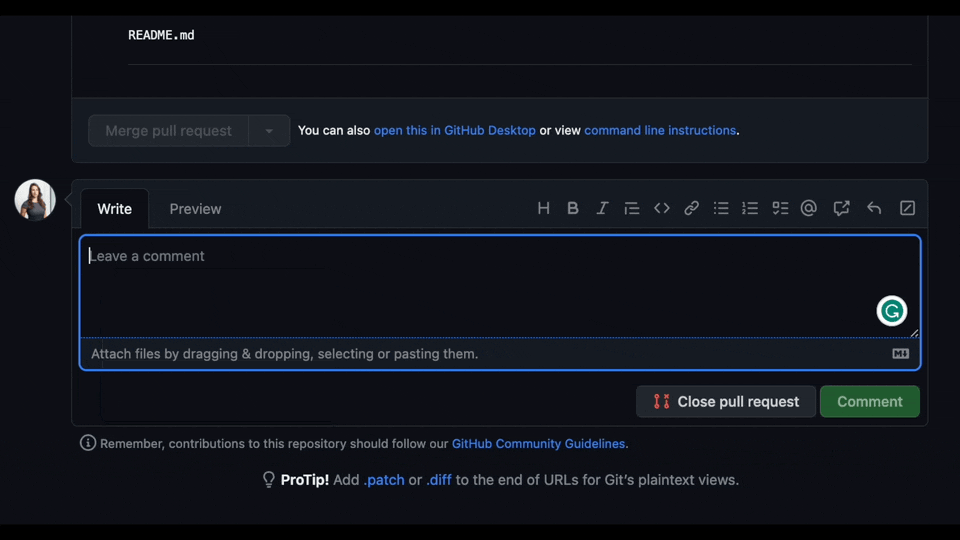
Mention @CodiumAI-Agent and add the desired command in any PR comment. The agent will generate a response based on your command, for example:
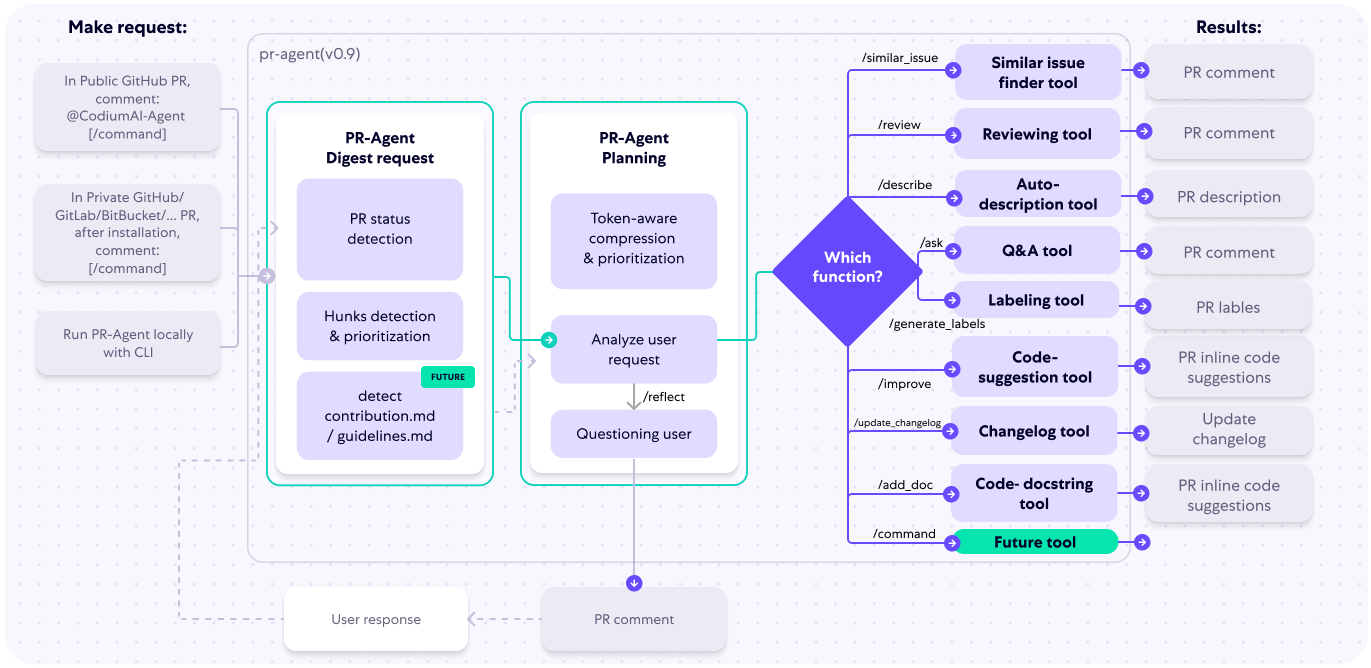
Available commands
Use one of the commands in a PR comment to get more insights.
Ask
/ask {your question} - Answers free-text questions about the PR.

Changelog
/changelog - Generates update to the CHANGELOG.md file listing relevant PR changes.
Describe
/describe - Generates detailed PR description, title, type, summary, code walkthrough and labels.
Improve
/improve: Committable code suggestions for improving the PR.
Review
/review - Generates PR review with test coverage, security issues, score, and insights.
Benefits of PR-Agent
- Quick and affordable answer retrieval (~30 seconds). Each tool (review, improve, ask, ...) has a single GPT-4 call, no more.
- Any PR size can be effectively used in as a context thanks uur compression strategy.
- Each command is modular and can be controlled with shared configuration file.
- Multiple git providers GitHub, Gitlab, Bitbucket are supported.
- Multiple platforms to use the commands (CLI, GitHub Action, GitHub App, Docker, ...) are supported.
- Multiple models (GPT-4, GPT-3.5, Anthropic, Cohere, Llama2) are supported.
PR-Agent Pro 💎
PR-Agent Pro is a hosted version of PR-Agent, provided by CodiumAI.
Benefits of PR-Agent Pro:
-
Fully managed - We take care of everything for you - hosting, models, regular updates, and more. Installation is as simple as signing up and adding the PR-Agent app to your GitHub\BitBucket repo.
-
Improved privacy - No data will be stored or used to train models. PR-Agent Pro will employ zero data retention, and will use an OpenAI account with zero data retention.
-
Improved support - PR-Agent Pro users will receive priority support, and will be able to request new features and capabilities.
-
Extra features -In addition to the benefits listed above, PR-Agent Pro will emphasize more customization, and the usage of static code analysis, in addition to LLM logic, to improve results. It has the following additional features:
How it works
Check out the PR Compression strategy page for more details on how we convert a code diff to a manageable LLM prompt
Features support
PR-Agent offers extensive pull request functionalities across various git providers.
💎 marks a feature available only in PR-Agent Pro
| GitHub | Gitlab | Bitbucket | ||
|---|---|---|---|---|
| TOOLS | Review | ✔️ | ✔️ | ✔️ |
| Incremental | ✔️ | |||
| SOC2 Compliance 💎 | ✔️ | ✔️ | ✔️ | |
| Ask | ✔️ | ✔️ | ✔️ | |
| Describe | ✔️ | ✔️ | ✔️ | |
| Inline file summary 💎 | ✔️ | ✔️ | ✔️ | |
| Improve | ✔️ | ✔️ | ✔️ | |
| ⮑ Extended | ✔️ | ✔️ | ✔️ | |
| Custom Suggestions 💎 | ✔️ | ✔️ | ✔️ | |
| Reflect and Review | ✔️ | ✔️ | ✔️ | |
| Update CHANGELOG.md | ✔️ | ✔️ | ✔️ | |
| Find Similar Issue | ✔️ | |||
| Add PR Documentation 💎 | ✔️ | ✔️ | ✔️ | |
| Generate Custom Labels 💎 | ✔️ | ✔️ | ||
| Analyze PR Components 💎 | ✔️ | ✔️ | ✔️ | |
| USAGE | CLI | ✔️ | ✔️ | ✔️ |
| App / webhook | ✔️ | ✔️ | ||
| Tagging bot | ✔️ | |||
| Actions | ✔️ | |||
| CORE | PR compression | ✔️ | ✔️ | ✔️ |
| Repo language prioritization | ✔️ | ✔️ | ✔️ | |
| Adaptive and token-aware file patch fitting | ✔️ | ✔️ | ✔️ | |
| Multiple models support | ✔️ | ✔️ | ✔️ | |
| Incremental PR review | ✔️ | |||
| Static code analysis 💎 | ✔️ | ✔️ | ✔️ | |
| Global configuration 💎 | ✔️ | ✔️ | ✔️ |
Custom installation process
To get started with PR-Agent quickly, you first need to acquire two tokens:
-
An OpenAI key from here, with access to GPT-4.
-
A GitHub\GitLab\BitBucket personal access token (classic), with the repo scope. [GitHub from here]
There are several ways to use PR-Agent:
Locally - Using Docker image (no installation required) - Run from source
GitHub specific methods - Run as a GitHub Action - Run as a polling server - Run as a GitHub App - Deploy as a Lambda Function - AWS CodeCommit
GitLab specific methods - Run a GitLab webhook server
BitBucket specific methods - Run as a Bitbucket Pipeline - Run on a hosted app - Bitbucket server and data center
Use Docker image
A list of the relevant tools can be found in the tools guide.
To invoke a tool (for example review), you can run directly from the Docker image. Here's how:
-
For GitHub:
-
For GitLab:
Note: If you have a dedicated GitLab instance, you need to specify the custom url as variable:
docker run --rm -it -e OPENAI.KEY=<your key> -e CONFIG.GIT_PROVIDER=gitlab -e GITLAB.PERSONAL_ACCESS_TOKEN=<your token> -e GITLAB.URL=<your gitlab instance url> codiumai/pr-agent:latest --pr_url <pr_url> review
- For BitBucket:
For other git providers, update CONFIG.GIT_PROVIDER accordingly, and check the pr_agent/settings/.secrets_template.toml file for the environment variables expected names and values.
If you want to ensure you're running a specific version of the Docker image, consider using the image's digest:
docker run --rm -it -e OPENAI.KEY=<your key> -e GITHUB.USER_TOKEN=<your token> codiumai/pr-agent@sha256:71b5ee15df59c745d352d84752d01561ba64b6d51327f97d46152f0c58a5f678 --pr_url <pr_url> review
Or you can run a specific released versions of pr-agent, for example:
Run from source
- Clone this repository:
- Navigate to the
/pr-agentfolder and install the requirements in your favorite virtual environment:
Note: If you get an error related to Rust in the dependency installation then make sure Rust is installed and in your PATH, instructions: https://rustup.rs
- Copy the secrets template file and fill in your OpenAI key and your GitHub user token:
cp pr_agent/settings/.secrets_template.toml pr_agent/settings/.secrets.toml
chmod 600 pr_agent/settings/.secrets.toml
# Edit .secrets.toml file
- Run the cli.py script:
python3 -m pr_agent.cli --pr_url <pr_url> review
python3 -m pr_agent.cli --pr_url <pr_url> ask <your question>
python3 -m pr_agent.cli --pr_url <pr_url> describe
python3 -m pr_agent.cli --pr_url <pr_url> improve
python3 -m pr_agent.cli --pr_url <pr_url> add_docs
python3 -m pr_agent.cli --pr_url <pr_url> generate_labels
python3 -m pr_agent.cli --issue_url <issue_url> similar_issue
...
[Optional] Add the pr_agent folder to your PYTHONPATH
Run as a GitHub Action
You can use our pre-built Github Action Docker image to run PR-Agent as a Github Action.
- Add the following file to your repository under
.github/workflows/pr_agent.yml:
on:
  pull_request:
  issue_comment:
jobs:
  pr_agent_job:
    runs-on: ubuntu-latest
    permissions:
      issues: write
      pull-requests: write
      contents: write
    name: Run pr agent on every pull request, respond to user comments
    steps:
      - name: PR Agent action step
        id: pragent
        uses: Codium-ai/pr-agent@main
        env:
          OPENAI_KEY: ${{ secrets.OPENAI_KEY }}
          GITHUB_TOKEN: ${{ secrets.GITHUB_TOKEN }}
on:
  pull_request:
  issue_comment:

jobs:
  pr_agent_job:
    runs-on: ubuntu-latest
    permissions:
      issues: write
      pull-requests: write
      contents: write
    name: Run pr agent on every pull request, respond to user comments
    steps:
      - name: PR Agent action step
        id: pragent
        uses: Codium-ai/pr-agent@v0.7
        env:
          OPENAI_KEY: ${{ secrets.OPENAI_KEY }}
          GITHUB_TOKEN: ${{ secrets.GITHUB_TOKEN }}
Settings > Secrets and variables > Actions > New repository secret > Add secret:
The GITHUB_TOKEN secret is automatically created by GitHub.
-
Merge this change to your main branch. When you open your next PR, you should see a comment from
github-actionsbot with a review of your PR, and instructions on how to use the rest of the tools. -
You may configure PR-Agent by adding environment variables under the env section corresponding to any configurable property in the configuration file. Some examples:
Run as a polling server
Request reviews by tagging your GitHub user on a PR
Follow steps 1-3 of the GitHub Action setup.
Run the following command to start the server:
Run as a GitHub App
Allowing you to automate the review process on your private or public repositories.
-
Create a GitHub App from the Github Developer Portal.
-
Set the following permissions:
- Pull requests: Read & write
- Issue comment: Read & write
- Metadata: Read-only
- Contents: Read-only
-
Set the following events:
- Issue comment
- Pull request
- Push (if you need to enable triggering on PR update)
-
Generate a random secret for your app, and save it for later. For example, you can use:
-
Acquire the following pieces of information from your app's settings page:
-
App private key (click "Generate a private key" and save the file)
-
App ID
-
Clone this repository:
- Copy the secrets template file and fill in the following:
- Your OpenAI key.
- Copy your app's private key to the private_key field.
- Copy your app's ID to the app_id field.
- Copy your app's webhook secret to the webhook_secret field.
- Set deployment_type to 'app' in configuration.toml
The .secrets.toml file is not copied to the Docker image by default, and is only used for local development. If you want to use the .secrets.toml file in your Docker image, you can add remove it from the .dockerignore file. In most production environments, you would inject the secrets file as environment variables or as mounted volumes. For example, in order to inject a secrets file as a volume in a Kubernetes environment you can update your pod spec to include the following, assuming you have a secret named
pr-agent-settingswith a key named.secrets.toml:volumes: - name: settings-volume secret: secretName: pr-agent-settings // ... containers: // ... volumeMounts: - mountPath: /app/pr_agent/settings_prod name: settings-volumeAnother option is to set the secrets as environment variables in your deployment environment, for example
OPENAI.KEYandGITHUB.USER_TOKEN.
- Build a Docker image for the app and optionally push it to a Docker repository. We'll use Dockerhub as an example:
docker build . -t codiumai/pr-agent:github_app --target github_app -f docker/Dockerfile
docker push codiumai/pr-agent:github_app  # Push to your Docker repository
-
Host the app using a server, serverless function, or container environment. Alternatively, for development and debugging, you may use tools like smee.io to forward webhooks to your local machine. You can check Deploy as a Lambda Function
-
Go back to your app's settings, and set the following:
-
Webhook URL: The URL of your app's server or the URL of the smee.io channel.
-
Webhook secret: The secret you generated earlier.
-
Install the app by navigating to the "Install App" tab and selecting your desired repositories.
Note: When running PR-Agent from GitHub App, the default configuration file (configuration.toml) will be loaded. However, you can override the default tool parameters by uploading a local configuration file
.pr_agent.tomlFor more information please check out the USAGE GUIDE
Deploy as Lambda Function
- Follow steps 1-5 of Method 5.
- Build a docker image that can be used as a lambda function
shell docker buildx build --platform=linux/amd64 . -t codiumai/pr-agent:serverless -f docker/Dockerfile.lambda - Push image to ECR
- Create a lambda function that uses the uploaded image. Set the lambda timeout to be at least 3m.
- Configure the lambda function to have a Function URL.
- In the environment variables of the Lambda function, specify
AZURE_DEVOPS_CACHE_DIRto a writable location such as /tmp. (see link) - Go back to steps 8-9 of Method 5 with the function url as your Webhook URL.
The Webhook URL would look like
https://<LAMBDA_FUNCTION_URL>/api/v1/github_webhooks
AWS CodeCommit Setup
Not all features have been added to CodeCommit yet. As of right now, CodeCommit has been implemented to run the pr-agent CLI on the command line, using AWS credentials stored in environment variables. (More features will be added in the future.) The following is a set of instructions to have pr-agent do a review of your CodeCommit pull request from the command line:
- Create an IAM user that you will use to read CodeCommit pull requests and post comments
- Note: That user should have CLI access only, not Console access
- Add IAM permissions to that user, to allow access to CodeCommit (see IAM Role example below)
- Generate an Access Key for your IAM user
- Set the Access Key and Secret using environment variables (see Access Key example below)
- Set the
git_providervalue tocodecommitin thepr_agent/settings/configuration.tomlsettings file - Set the
PYTHONPATHto include yourpr-agentproject directory- Option A: Add
PYTHONPATH="/PATH/TO/PROJECTS/pr-agentto your.envfile - Option B: Set
PYTHONPATHand run the CLI in one command, for example:PYTHONPATH="/PATH/TO/PROJECTS/pr-agent python pr_agent/cli.py [--ARGS]
- Option A: Add
IAM Role Example
Example IAM permissions to that user to allow access to CodeCommit:
- Note: The following is a working example of IAM permissions that has read access to the repositories and write access to allow posting comments
- Note: If you only want pr-agent to review your pull requests, you can tighten the IAM permissions further, however this IAM example will work, and allow the pr-agent to post comments to the PR
- Note: You may want to replace the
"Resource": "*"with your list of repos, to limit access to only those repos
{
    "Version": "2012-10-17",
    "Statement": [
        {
            "Effect": "Allow",
            "Action": [
                "codecommit:BatchDescribe*",
                "codecommit:BatchGet*",
                "codecommit:Describe*",
                "codecommit:EvaluatePullRequestApprovalRules",
                "codecommit:Get*",
                "codecommit:List*",
                "codecommit:PostComment*",
                "codecommit:PutCommentReaction",
                "codecommit:UpdatePullRequestDescription",
                "codecommit:UpdatePullRequestTitle"
            ],
            "Resource": "*"
        }
    ]
}
Access Key and Secret
Example setting the Access Key and Secret using environment variables
export AWS_ACCESS_KEY_ID="XXXXXXXXXXXXXXXX"
export AWS_SECRET_ACCESS_KEY="XXXXXXXXXXXXXXXX"
export AWS_DEFAULT_REGION="us-east-1"
CLI Example
After you set up AWS CodeCommit using the instructions above, here is an example CLI run that tells pr-agent to review a given pull request. (Replace your specific PYTHONPATH and PR URL in the example)
PYTHONPATH="/PATH/TO/PROJECTS/pr-agent" python pr_agent/cli.py \
  --pr_url https://us-east-1.console.aws.amazon.com/codesuite/codecommit/repositories/MY_REPO_NAME/pull-requests/321 \
  review
Run a GitLab webhook
- From the GitLab workspace or group, create an access token. Enable the "api" scope only.
- Generate a random secret for your app, and save it for later. For example, you can use:
Run as a Bitbucket Pipeline
You can use the Bitbucket Pipeline system to run PR-Agent on every pull request open or update.
- Add the following file in your repository bitbucket_pipelines.yml
pipelines:
    pull-requests:
      '**':
        - step:
            name: PR Agent Review
            image: python:3.10
            services:
              - docker
            script:
              - docker run -e CONFIG.GIT_PROVIDER=bitbucket -e OPENAI.KEY=$OPENAI_API_KEY -e BITBUCKET.BEARER_TOKEN=$BITBUCKET_BEARER_TOKEN codiumai/pr-agent:latest --pr_url=https://bitbucket.org/$BITBUCKET_WORKSPACE/$BITBUCKET_REPO_SLUG/pull-requests/$BITBUCKET_PR_ID review
- Add the following secure variables to your repository under Repository settings > Pipelines > Repository variables.
OPENAI_API_KEY:
<your key>BITBUCKET_BEARER_TOKEN:<your token>
You can get a Bitbucket token for your repository by following Repository Settings -> Security -> Access Tokens.
Note that comments on a PR are not supported in Bitbucket Pipeline.
CodiumAI-hosted Bitbucket app
Please contact support@codium.ai or visit CodiumAI pricing page if you're interested in a hosted BitBucket app solution that provides full functionality including PR reviews and comment handling. It's based on the bitbucket_app.py implementation.
Bitbucket Server and Data Center
Login into your on-prem instance of Bitbucket with your service account username and password.
Navigate to Manage account, HTTP Access tokens, Create Token.
Generate the token and add it to .secret.toml under bitbucket_server section
Run as CLI
Modify configuration.toml:
and pass the Pull request URL:
python cli.py --pr_url https://git.onpreminstanceofbitbucket.com/projects/PROJECT/repos/REPO/pull-requests/1 review
Run as service
To run pr-agent as webhook, build the docker image:
docker build . -t codiumai/pr-agent:bitbucket_server_webhook --target bitbucket_server_webhook -f docker/Dockerfile
docker push codiumai/pr-agent:bitbucket_server_webhook  # Push to your Docker repository
Navigate to Projects or Repositories, Settings, Webhooks, Create Webhook.
Fill the name and URL, Authentication None select the Pull Request Opened checkbox to receive that event as webhook.
The URL should end with /webhook, for example: https://domain.com/webhook
Data privacy
If you host PR-Agent with your OpenAI API key, it is between you and OpenAI. You can read their API data privacy policy here: https://openai.com/enterprise-privacy
When using PR-Agent Pro 💎, hosted by CodiumAI, we will not store any of your data, nor will we use it for training. You will also benefit from an OpenAI account with zero data retention.
Links